
Flying, firing and every button
How to fly, aim and fire on a phone, with a keyboard and mouse, or with a gamepad, and what every readout and button on the screen does in a mission. The menus outside a mission are on the Menus page.
01 Quick reference
The game is built around a phone held sideways, and plays fully with a keyboard and mouse or a gamepad. Portrait isn't supported: turn the phone on its side. The sections below go through every control in depth, and the settings that change them are on the Menus page.
| Do this | To |
|---|---|
| Left thumb, anywhere on the left half | Fly. A stick appears where your thumb lands, and you move in screen directions. |
| Right thumb, anywhere on the right half | Point the nose. Hold your thumb still and the nose holds still. |
| Double-tap and hold the right thumb | Fire wherever the nose points, whether or not anything is there. |
| The weapon buttons in the left half | Fire your arsenal item, your special weapon and your accessory. Press one and keep your thumb down to fly straight on. See the weapon buttons. |
 Tap a hostile | Mark it with red brackets: your seekers go for it first. Tap it again to clear the mark. |
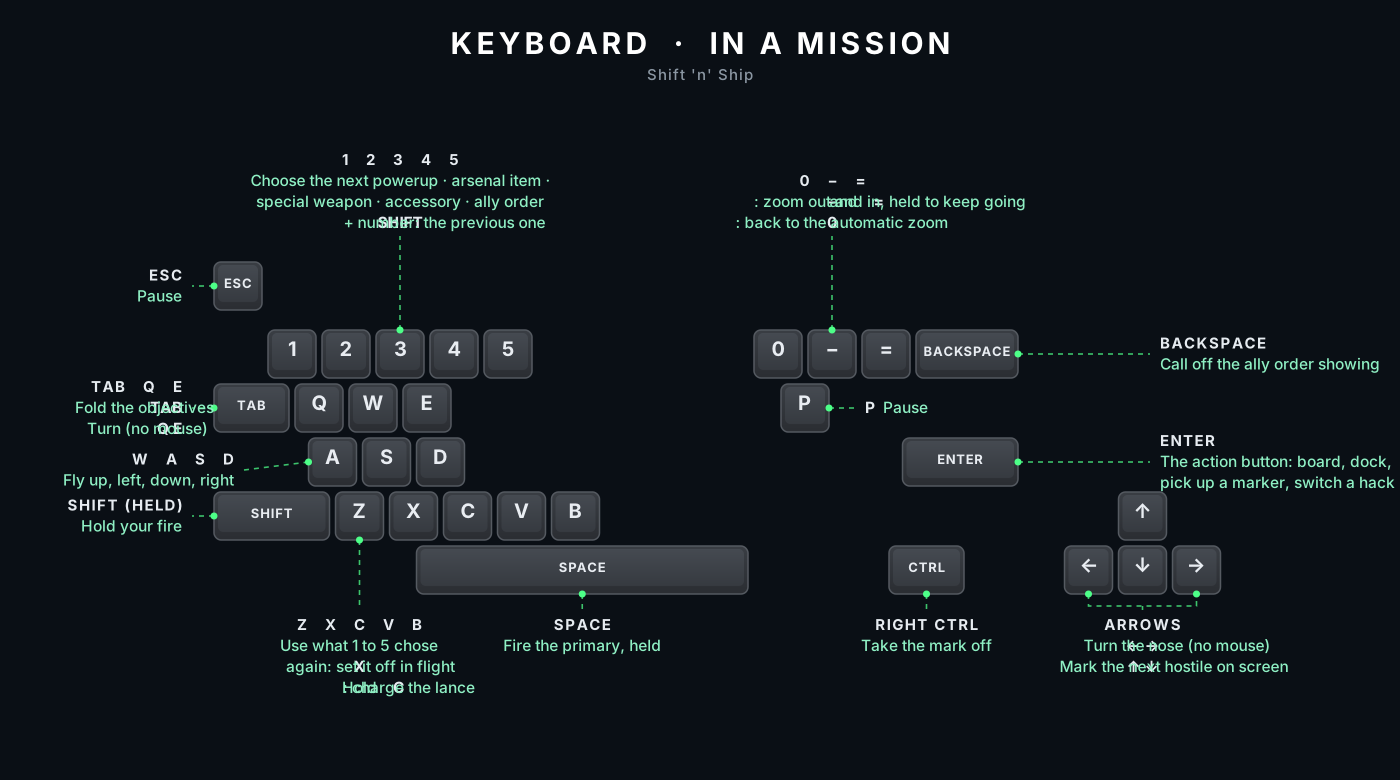
| Key | To |
|---|---|
| W A S D | Fly in screen directions |
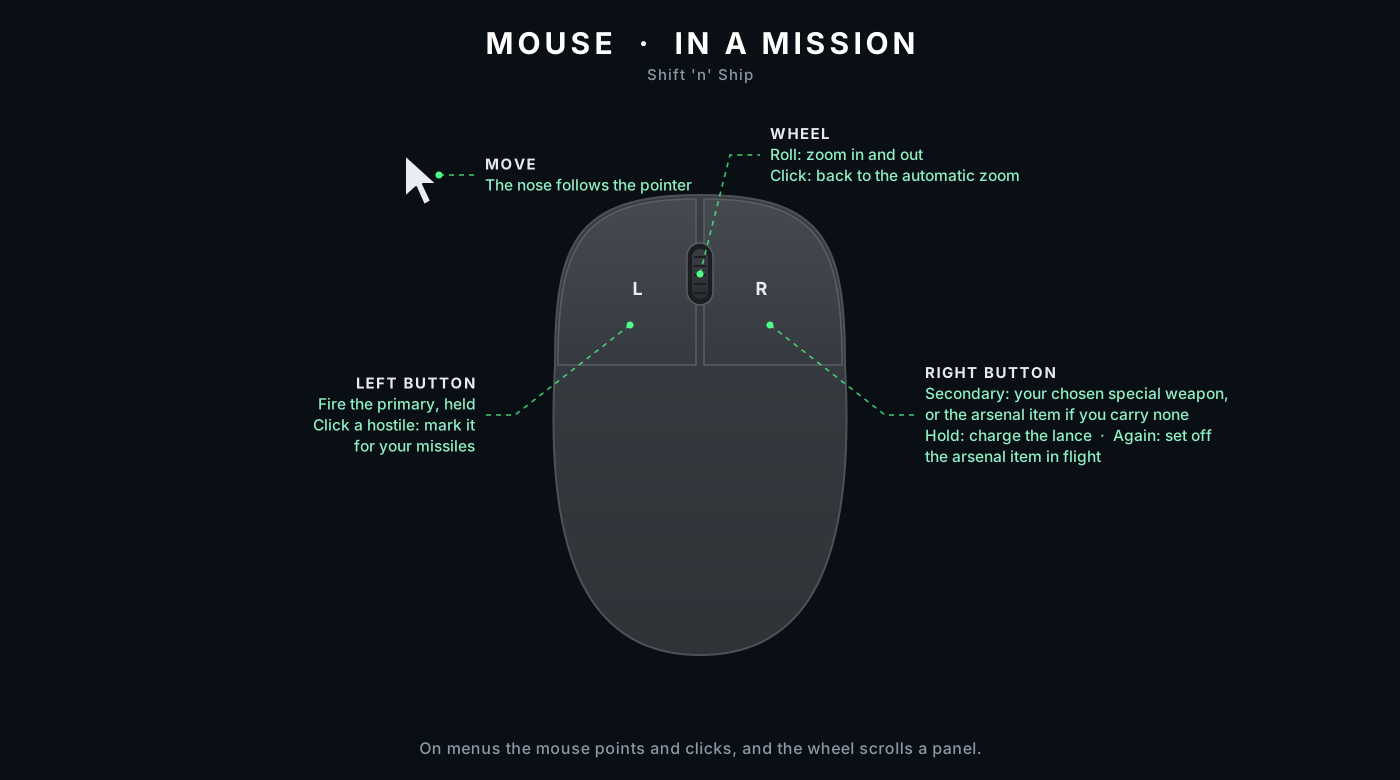
| Mouse | The nose follows the cursor |
| Left button or Space | Hold to fire. Click a hostile to mark it. |
| Right button | The secondary fire: your chosen special weapon, or the arsenal item if you carry no special. Hold it to charge the lance. |
| Q E or ← → | Rotate, for playing without a mouse |
| ↑ ↓ | Mark the next hostile on screen, further or nearer, wrapping round. Right Ctrl takes the mark off. |
| Shift (held) | Hold your fire |
| 1 2 3 4 5 | Choose the next powerup, arsenal item, special weapon, accessory or ally order, in the order the HUD shows them. With Shift, choose the previous one. |
| Z X C V B | Use whatever 1 to 5 has chosen. X again sets it off in flight. Hold C to charge the charge lance and release to fire. With the cloak chosen, V switches it on and off; with the Amplifier chosen, it switches it on. B sends the ally order; a paid Zena call takes it twice. |
| Backspace | Call off the ally order showing |
| Enter | Press the action button: board or leave a monitor, dock, pick up a tracker marker or wormhole point, or switch a hack |
| Tab | Fold or unfold the objective list |
| = - or the mouse wheel | Zoom in and out; hold the key to keep zooming. 0 or a click of the wheel hands the camera back to the automatic zoom. |
| P or Esc | Pause |
On a gamepad
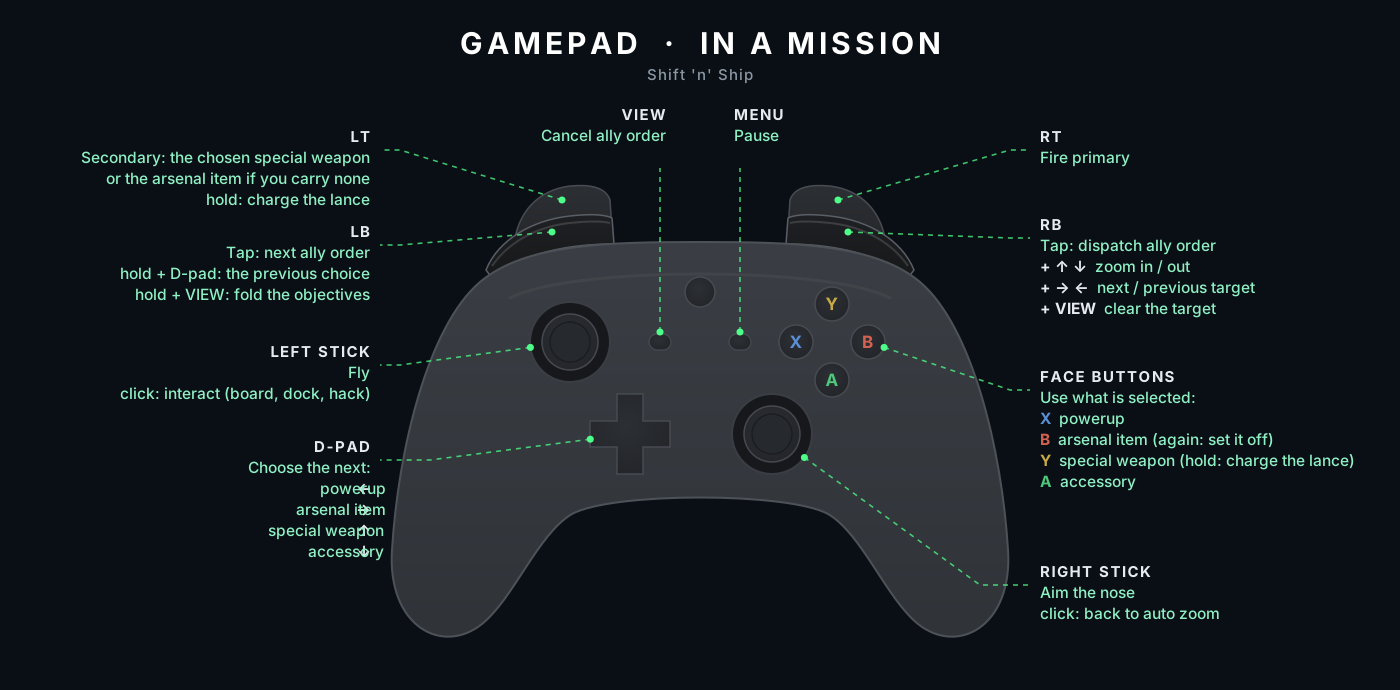
Any standard gamepad works. The left stick flies, the right stick aims, RT fires and LT is the secondary; the D-pad picks and the face buttons use your powerups, arsenal, special weapons and accessories, in the same directions: left for powerups, right for the arsenal, up for special weapons, down for accessories. Hold RB with the D-pad up or down to zoom, or right and left to mark the next hostile on screen (RB with View takes the mark off), and click the right stick to go back to the automatic zoom. The menus work from the pad too. Every button is listed below.
The buttons on screen
One-time cards explain the controls the first time each one matters, worded for your device.
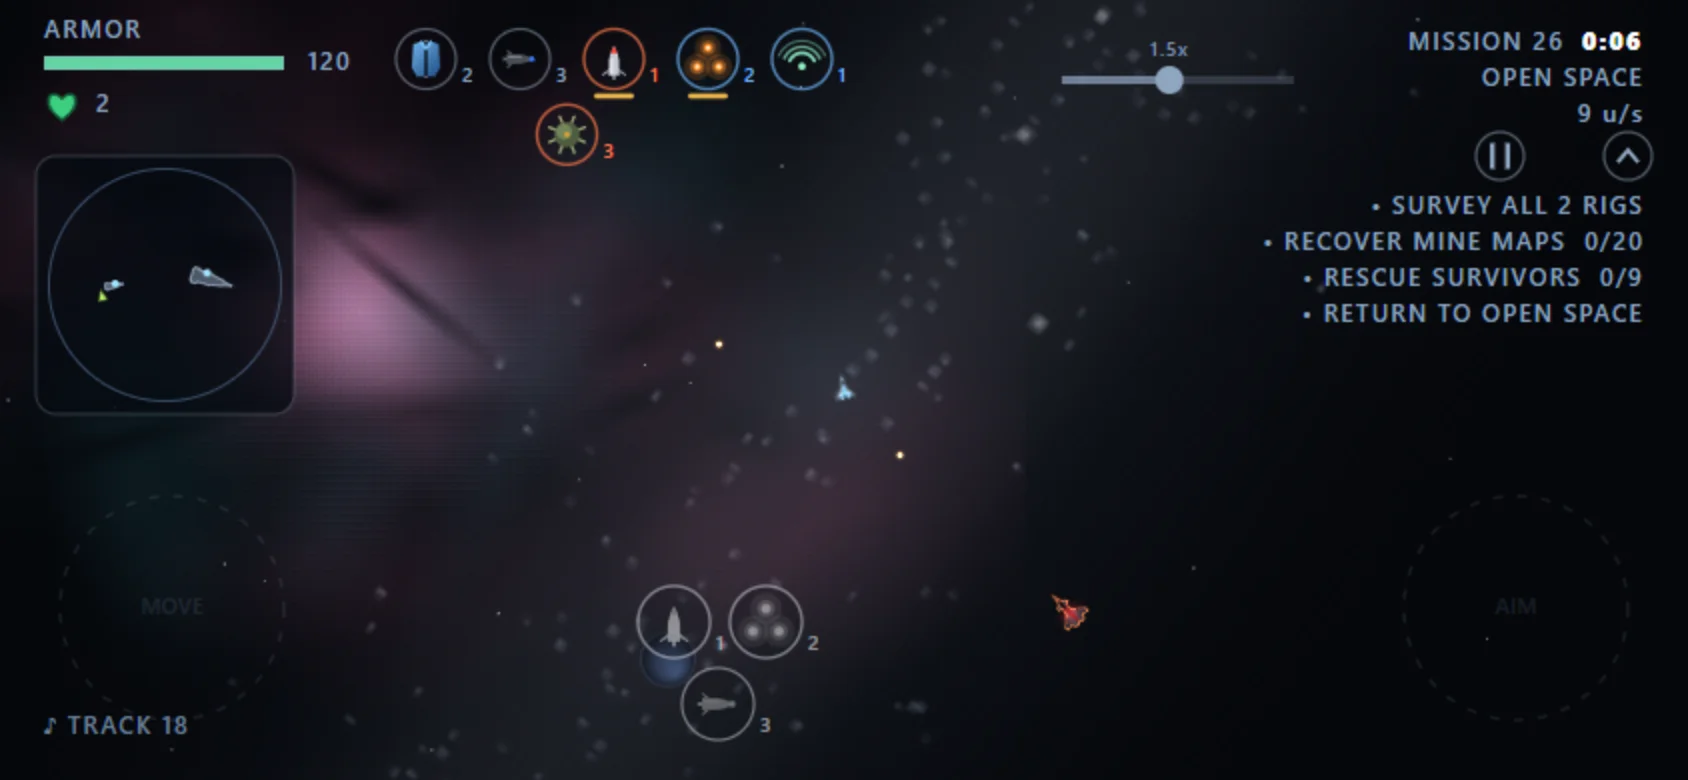
- Special weapons and accessories each have a dial of their own along the top, beside your armor. A dim dial is still cooling down. On a computer you click a dial to fire it; on a touch screen you tap it to choose what its weapon button fires.
- The powerup and arsenal discs: press once to choose an item, press twice quickly to use it.
- On a touch screen, three weapon buttons in the left half fire the arsenal item, the special weapon and the accessory. See The weapon buttons.
- The action button offers whatever is nearest that you can act on: boarding or leaving a monitor, docking on a repair craft, picking a tracker marker or a wormhole point back up, or starting and stopping a hack.
- The ally command disc, once you have allies: tap to cycle orders, double tap to send ships. See Ordering your allies.
- Pause, and while paused, the hangar, which takes two presses and leaves the mission.
- The zoom slider takes the camera by hand for a few seconds, then hands it back. On a computer the = and - keys and the mouse wheel do the same, and 0 or a wheel click hands it back at once. The ring at the top of the objective list folds the list away; on a computer Tab does the same, and on a gamepad LB with View.
On a keyboard, a shield is a powerup, so raise one with 1 then Z. The cloak is an accessory: 4 then V.
Settings worth knowing
- AUTO-FIRE (on): the gun finds its own targets within about 20 degrees of the nose. Turn it off and it fires only where you point it.
- AUTO-AIM (on): nudges your rounds onto a target within 6 degrees, and leads it if it's moving. A faint red sight line shows when it's working.
- CORRIDOR LINE OF SIGHT (off): turn it on and hostiles round a corner are hidden until you can see them.
- EXPLOSIVE FRAGMENTS (on): debris thrown by explosions. Purely for looks.
Big explosions (nukes, a sticky bomb, a monitor or capital ship going down) flash the screen and shake your ship. The nearer you are, the stronger it is, and a blast out of sight still shakes you.
The corners of the screen glow red while your ship is taking real damage: a lot at once, a steady drain, or any hit at all once you're below half armor.
02 Flying & firing
On a phone or tablet
- Left thumb flies. A stick appears wherever your thumb lands in the left half; push the way you want to go on screen. It follows your thumb if you overshoot.
- Right thumb points the nose. A stick appears where your thumb lands in the right half, and the nose points the way you push from there. Just past the aim dead zone it starts from where the nose already is and swings round as you push further, so a short push nudges it and a long one points it. RELATIVE AIM turns the ship as far as your thumb turns instead.
- Double tap and hold on the right to fire for as long as your thumb stays down. FIRING shows above the stick, and the gun shoots straight ahead whatever the auto-fire is doing.
- The weapon buttons sit in the left half too. Pressing one fires it and starts the flying stick under the same thumb, so you can slide off it and keep flying without lifting. See The weapon buttons.
- Pressing any other HUD button never starts a stick. Hold the phone sideways: portrait shows a reminder to turn it.
With a mouse
- Moving the mouse over the game switches to mouse aiming: the nose points at the cursor.
- Hold the left button to fire straight down the nose.
- The mouse wheel zooms during a mission: up to zoom in, down to zoom out. Click the wheel to hand the camera back to the automatic zoom. In the menus it scrolls as before.
- The right button is the secondary fire: your chosen special weapon, or the arsenal item if you carry no special. Holding and releasing matters for the charge lance and the railgun.
- The game wants a landscape window. If the browser window is nearly square or smaller than about 800 by 450, it asks you to make it wider.
Keyboard
| Key | What it does |
|---|---|
| W A S D | Fly up, left, down and right on screen, whichever way the ship faces |
| Q E or ← → | Turn the nose left and right |
| ↑ ↓ | Mark the next hostile on screen: up the next one further away, down the next one nearer, wrapping round |
| Right Ctrl | Take the mark off |
| Shift (held) | Hold fire: stops all automatic firing |
| Space | Fire while held, like the left button. There's no key that keeps firing on its own. |
| 1 2 3 4 5 | Cycle the powerups, the arsenal, the special weapons, the accessories and the ally order, left to right as the HUD draws them. Shift with the number cycles backwards. |
| Z X C V B | Use what 1 to 5 has selected. X again sets it off in flight; hold C to charge the charge lance and release to fire; with the cloak selected, V switches it on and off; B sends the ally order, and a paid Zena call takes it twice. |
| Backspace | Call off the ally order showing |
| Enter | Press the action button: board or leave a monitor, dock, pick up a tracker marker or wormhole point, switch a hack |
| Tab | Fold or unfold the objective list, as its ring does |
| = (or +) and - | Zoom in and out a step. Hold to keep zooming smoothly. |
| 0 | Hand the camera back to the automatic zoom |
| P or Esc | Pause |
With AUTO-FIRE on, the gun also fires by itself at Corp targets near the nose. On a computer, a short legend at the start of each mission shows the keys and goes away once you start flying. On a touchscreen, a one-time card explains the two thumbs instead, and more cards explain the weapon buttons the first time you carry something they fire.
Gamepad
Any standard gamepad works. Buttons are named as on an Xbox controller, with the keyboard or mouse control that does the same thing alongside.
| Gamepad | What it does | Same as |
|---|---|---|
| Left stick | Fly, in screen directions | W A S D |
| Right stick | Point the nose | The mouse cursor |
| RT | Fire the primary guns while held | Left button, Space |
| LT | The secondary fire: your chosen special weapon, or the arsenal item if you carry no special. Hold it to charge the charge lance. | Right button |
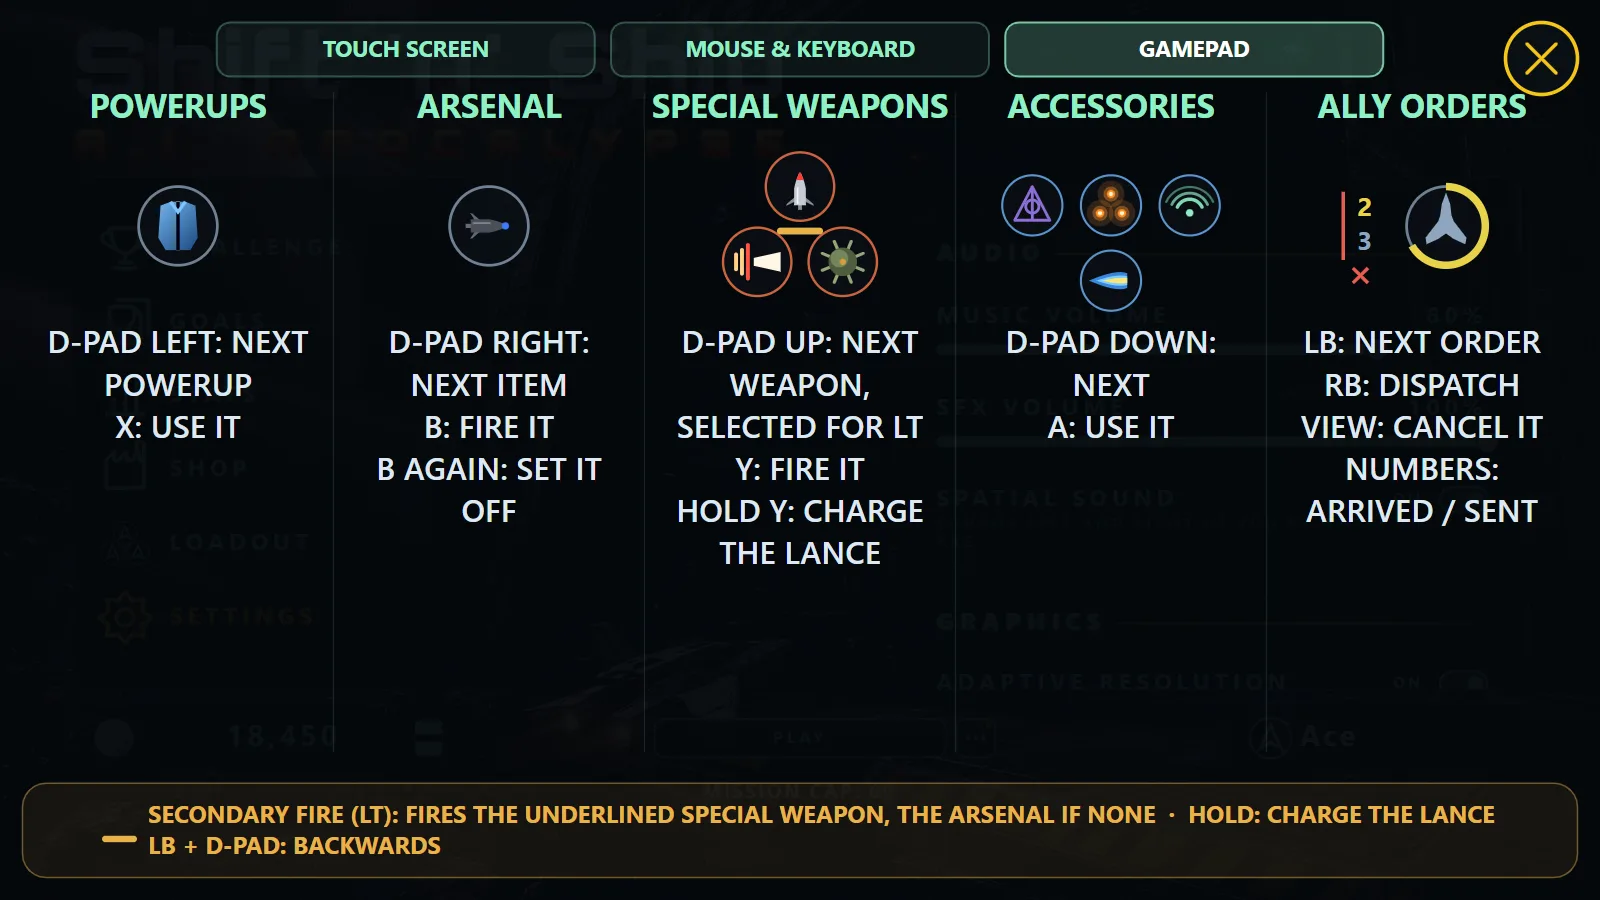
| D-pad left / right / up / down | Choose the next powerup / arsenal item / special weapon / accessory, in the order the dials run across the top. Up also chooses the special weapon LT fires. | 1 2 3 4 |
| X / B / Y / A | Use the selected powerup / arsenal item / special weapon / accessory: each face button sits in the same direction as its D-pad press. B again sets it off in flight; hold Y to charge the lance. | Z X C V |
| LB held + D-pad | Choose the previous one in that group | Shift + 1–4 |
| LB | Choose the next ally order, when you let go of it without having pressed the D-pad or View | 5 |
| RB | Send the ally order, when you let go of it without having pressed the D-pad or View | B |
| RB held + D-pad up / down | Zoom in / out. A press steps; hold to keep zooming. | = -, the mouse wheel |
| RB held + D-pad right / left | Mark the next hostile on screen, further / nearer | ↑ ↓ |
| RB held + View | Take the mark off | Right Ctrl |
| LB held + View | Fold or unfold the objective list | Tab |
| Right stick click | Back to the automatic zoom | 0, a wheel click |
| View / Back | Call off the ally order showing (on its own, without LB or RB held) | Backspace |
| Left stick click | Press the action button: board or leave a monitor, dock, pick up a marker, switch a hack | Enter |
| Menu / Start | Pause | P or Esc |
Browsers don't let a gamepad start sound, so the game is silent until your first click, tap or key press. The stick dead zone and sensitivity are in Settings, and the menus can be worked from the pad too: see Menus with a keyboard or gamepad.
03 The HUD
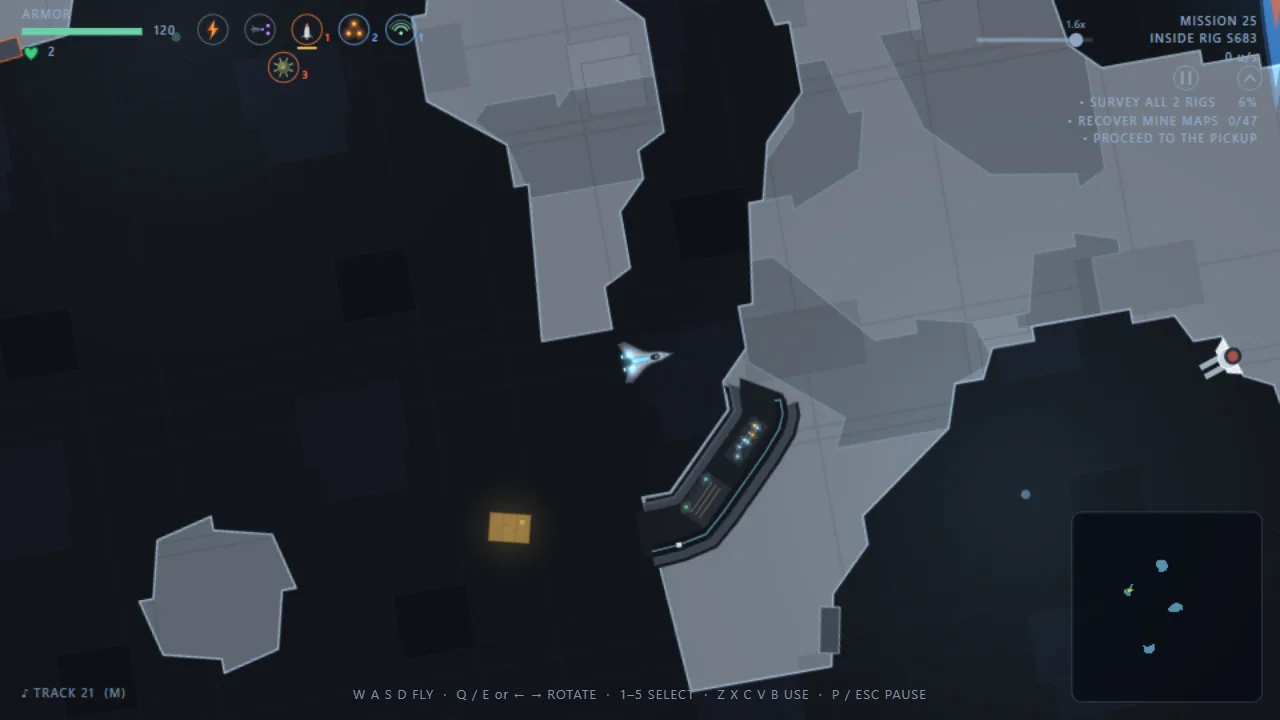
Top left: your ship
- ARMOR bar and figure, turning red when low.
- A shield bar stacked on it in the shield's color, only while one is up.
- A thin rail under the armor for the firing time left: brass for the Shredder-Mini, green for the Viper Gatling, and rails of their own for the twin laser's fire, the shotgun's shells and reload, and the Basilisk's and Mamba's heat (red while the gun is locked).
- An emerald heart and the number of spare lives. It disappears on your last ship.
Top right: the mission
- MISSION N with how long you've been flying it, where you are (OPEN SPACE or INSIDE RIG S###), and your speed.
- The objective list: • open, ✓ done, with a percentage on counting objectives. On your first three missions the next thing to do pulses white. On lode missions your ore hold sits under it: what you're carrying over what you've delivered.
- The chart, with you as a lime triangle pointing the way you're heading. Inside a rig it's that rig's plan, filled in as you fly, with its bay mouths marked in yellow once you've charted near them; in open space it shows the whole volume, capital ships once you or one of yours has been near them, the collector, the pickup, your markers, your marked target and any crystal floating loose. It fills with static while a signal jammer is transmitting.
Top center: messages
- Repair messages on a pad: REPAIRING with a bar, then ARMOR REPAIRED.
- A self-destruct countdown,
T-NNN s, shown now and then and for good in the last quarter. It turns amber from halfway and pulses red in the last 20 seconds. - The radio card, in the top right while Leo or Nikki is talking: their photo, name and words. GOT IT sends it away while the voice plays on. The objective list folds while it's up and opens again afterwards if it was open. SUBTITLES in Settings turns it off.
- Hint cards: one-time tips with a picture, shown once ever. They can't be dismissed for the first two seconds, then a GOT IT chip appears and a tap clears them. Some explain the controls the first time they matter: the thumbs on your first touchscreen mission, each hold disc the first time it has something on it, and the special-weapon dials the first time you carry one (on a touch screen, the arsenal and special weapon buttons instead). Others come when they're useful: backing onto a repair pad the first time you're hurt with one in sight, marking a target the first time you carry seekers, a crawl bomb or a Sidewinder Salvo with a Corp ship in sight (and a reminder to mark first for the crawl bomb and the salvo), and that a tap switches a hold disc between items the first time a shelf holds two kinds. Their wording follows your device: a phone says tap and double tap, a computer says CLICK, RIGHT CLICK and the keys, and once you have used a gamepad they name its buttons instead (PRESS B TO FIRE THE ARSENAL ITEM, AGAIN TO SET IT OFF).
 Marking a target
Tap or click a Corp ship to mark it with red brackets (and a red cross on the chart). Your seekers go for it first. Tap it again to clear the mark; tapping empty space changes nothing. A cloaked ship can't be marked. Without a mouse or a touchscreen, the ↑ and ↓ keys (or RB with the D-pad right and left) step the mark through the Corp targets on screen, further or nearer, and right Ctrl (or RB with View) takes it off. They only pick what you can see: nothing behind a hull, and a corridor gun only while you're inside its rig.
04 Item & weapon buttons
The hold discs
Two round buttons beside your armor: powerups on the left and arsenal on the right. Each shows the mark of the item it's set to, with a count when you hold more than one.
| Press | What it does |
|---|---|
| Once | Chooses the next item on that shelf. |
| Twice quickly | Uses the chosen item, with a ring flashing out of the disc. |
| Arsenal disc, warhead in flight | The disc turns amber with a fuse ring; press to set the warhead off where it is. |
- A disc dims when its item is used up or not ready, and a grey arc fills while something recharges, like the Time Freeze's wait.
- Your choice is remembered. When you use the last of a kind, the disc stays on it, dimmed, for a second and a half, so a quick second press spends nothing. Then it moves to the next kind you hold, or shows nothing if that shelf is empty. A warhead still in flight, or a wormhole point still in hand, keeps its place.
- Nothing on these discs is ever used for you.
Special-weapon and accessory dials
One dial for each special weapon and accessory your ship carries, each wearing its weapon's mark: special weapons in an orange-rimmed group, accessories in a blue-rimmed one.
| What you see | What it means |
|---|---|
| Full brightness | Ready. See what a press does below. |
| Dimmed | Recharging, out of charges, or can't be used right now. |
| Number beside it | Charges ready. For mines and turrets, how many more you can put down; for the tracker, markers left. |
| Arc round the rim | How far the next charge has recharged. |
| Yellow underline | On a computer or gamepad, the special weapon the secondary fire will fire. On a touch screen, the special weapon and the accessory your two upper weapon buttons will fire. |
What a press does on each device
On a computer you click the dials themselves, and the secondary fire (the right button, or LT on a gamepad) fires the underlined special weapon. On a touch screen the dials only choose, and the weapon buttons do the firing.
| Dial | Mouse and keyboard | Touch screen |
|---|---|---|
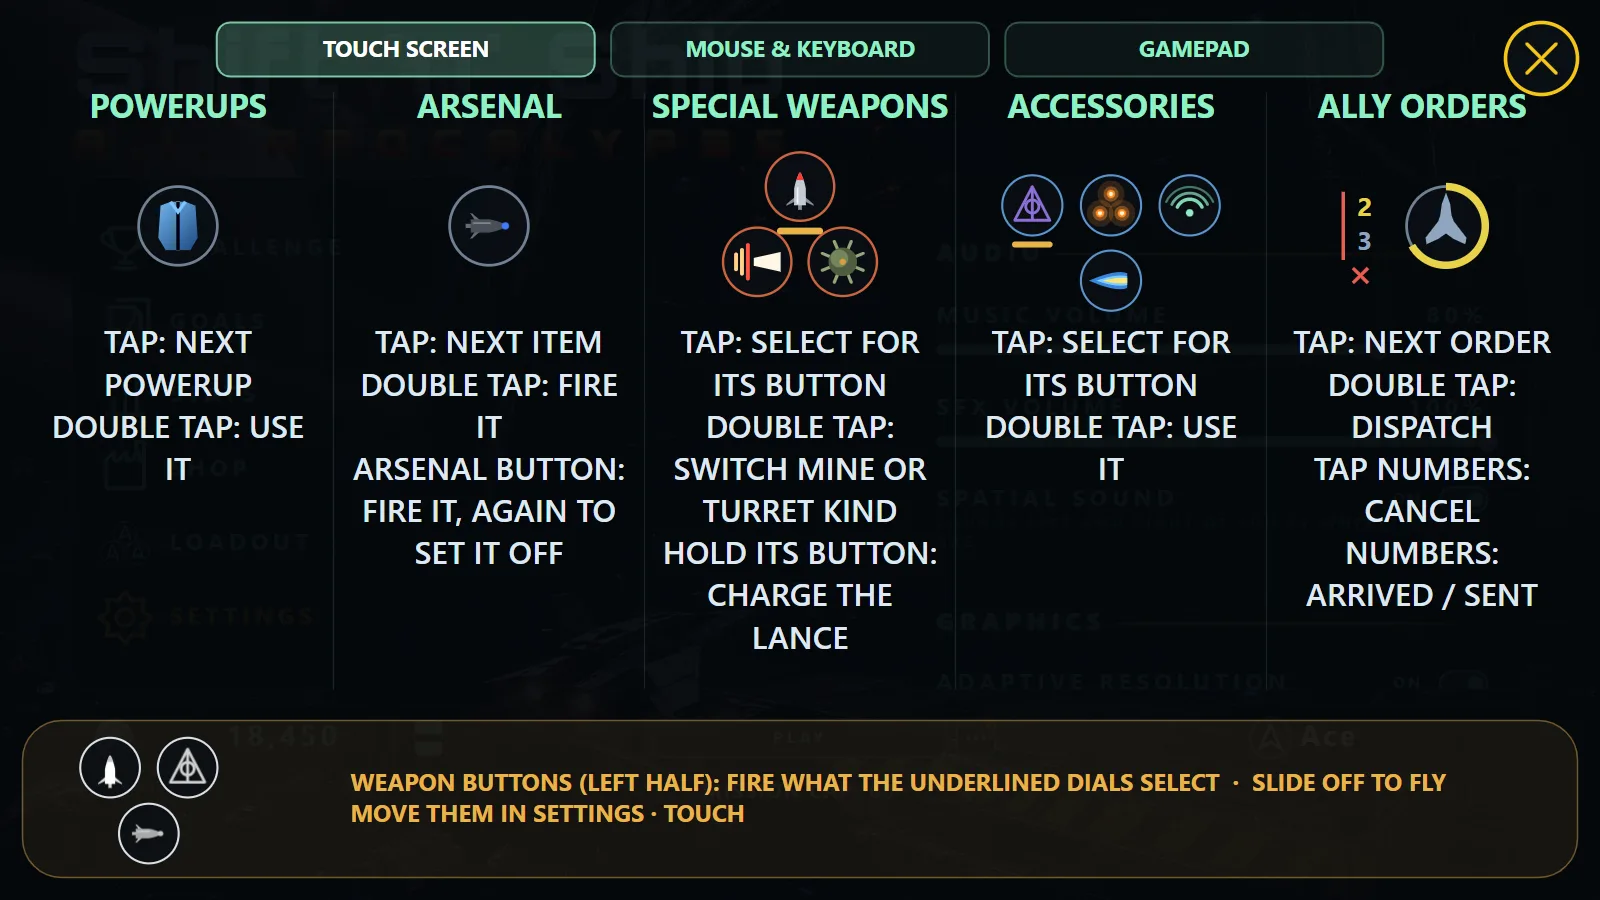
| Powerups disc | Click cycles. Double click uses. | Tap cycles. Double tap uses. |
| Arsenal disc | Click cycles. Double click fires, and again sets it off in flight. | Tap cycles. Double tap fires. The arsenal button fires it too, and again sets it off in flight. |
| Special weapon dial | Click fires. Double click also chooses it for the secondary fire. | Tap chooses it for the special weapon button (underlined). |
| Charge lance | Hold to charge, release to fire. A quick double click chooses it without wasting a charge. | Tap chooses it. Hold the special weapon button to charge and lift to fire. |
| Bankshot railgun | Click shows the aim line, the next click fires. Double click chooses it. | Tap chooses it. Its button shows the aim line, and pressed again fires. |
| Mine or turret pair | Click switches kind. Double click puts it down. | Tap chooses it. Double tap switches kind. Its button puts it down. |
| Accessory dial | Click uses it (flares, cloak, tracker, booster...). | Tap chooses it for the accessory button (underlined). Double tap uses it. |
| Secondary fire | Fires the chosen special, or the arsenal item if you carry no special. Never a powerup. | None: the weapon buttons take its place. |
A gamepad works like the keyboard: the D-pad chooses and X, B, Y and A use, with LT as the secondary fire.
The weapon buttons (touch screens)
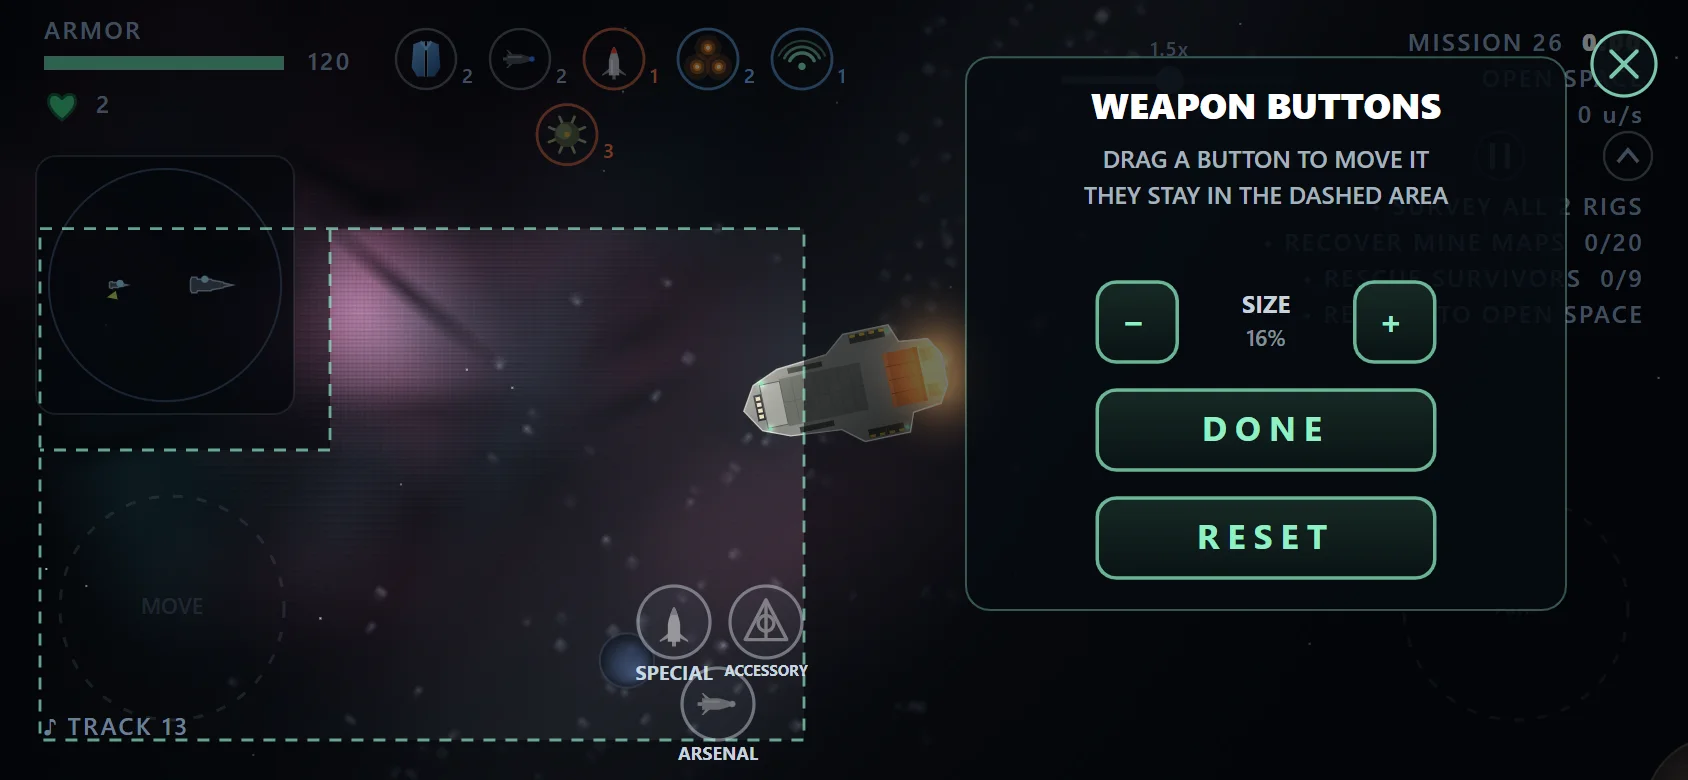
On a phone or tablet, three white, see-through buttons sit in the left half, under your flying thumb. They mirror the dials at the top: each wears the mark, count and cooldown ring of what it fires.
- Arsenal button (at the bottom): fires the selected arsenal item. Press it again to set it off in flight.
- Special weapon button (up and to the left): fires the special weapon whose dial is underlined. Hold it to charge the charge lance and lift to fire.
- Accessory button (up and to the right): uses the accessory whose dial is underlined: flares, the cloak, the tracker, the booster and so on.
- A button only shows while there's something for it to fire.
- Pressing a button also starts the flying stick under that thumb, so you can fire and slide off it to fly on without lifting.
- Move and resize them under SETTINGS > TOUCH > WEAPON BUTTONS. By default they sit in a small triangle at the bottom right of the left half, toward the middle of the screen.
The HUD DIALS diagram
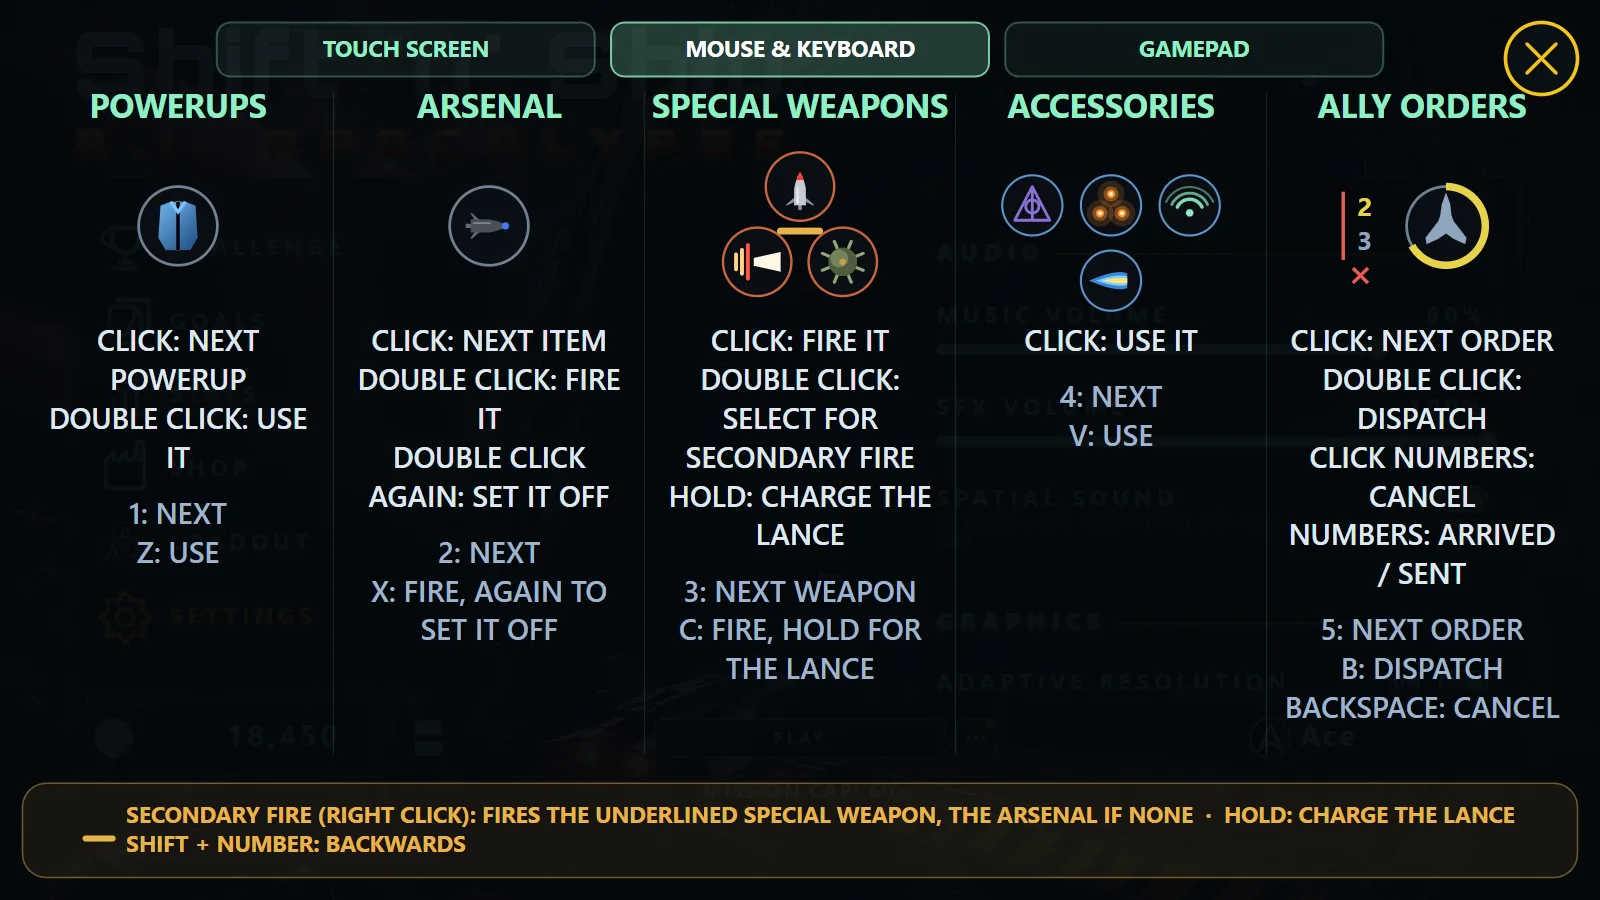
SETTINGS > CONTROLS > HUD DIALS shows all of this in the game: each dial, what a tap, a double tap and the keys or gamepad buttons do, and what the secondary fire or the weapon buttons fire, with a tab for each device. It opens on the one you're using. A yellow bar marks the dial that will be fired, as it does in a mission.
Weapons with their own rhythm
- Charge lance: hold to charge (the arc fills), release to fire. Once it's full the arc drains in red: let go before it empties or it backfires.
- Bankshot railgun: first press shows the aim path for 12 seconds, following your nose; press again to fire.
- Sticky bomb: first press throws it, press again to set it off.
- Turrets and mines: carrying both turrets, or both mines, gives one dial. On a computer click to switch which and double click to put it down; on a touch screen double tap the dial to switch which, and its weapon button puts it down.
- Cloak: press to switch on and off (on a touch screen, double tap its dial or use the accessory button; on a keyboard, 4 to select it, then V). A purple arc shows cloak time left over a grey arc showing the refill; the rim turns yellow while you're cloaked.
- Booster: one boost at a time, even with charges ready.
- Amplifier: press to switch it on. It runs for its duration and then cools down; an orange arc ahead of your nose brightens as it charges.
- Magnetico: press to switch it on and gather junk; press again to throw it ahead, or hold the press for half a second to throw it all around.
- Mines and turrets: putting one down holds your ship for a moment: a full stop on the lightest hulls, less on heavier ones.
05 Screen controls
A row of round controls along the top right, beside the objective list.
| Control | What it does |
|---|---|
| Fold ring | Folds the objective list to one line (the next thing to do) with a +n for the rest. Press again to unfold. Same as Tab, or LB with View on a gamepad. |
| Pause | Two bars while flying, a play arrow while paused. Same as P. |
 Hangaronly while paused | Leaves the mission. Two presses: the first turns it amber with AGAIN. Leaving banks nothing new for that mission except your flight time. |
| Ally command disc | Orders for your allies. See below. |
| Action button | Whatever is nearest that you can act on: boarding or leaving a monitor, docking on a repair craft, picking up a tracker marker or wormhole point, or starting and pausing a hack. |
| Zoom groove | Drag the knob to take the camera: left is widest, right is closest, with the magnification above it. A red cross hands the camera back; otherwise it goes back by itself after the ZOOM EXPIRATION setting. The = and - keys, the mouse wheel and RB with the D-pad move the same knob. |
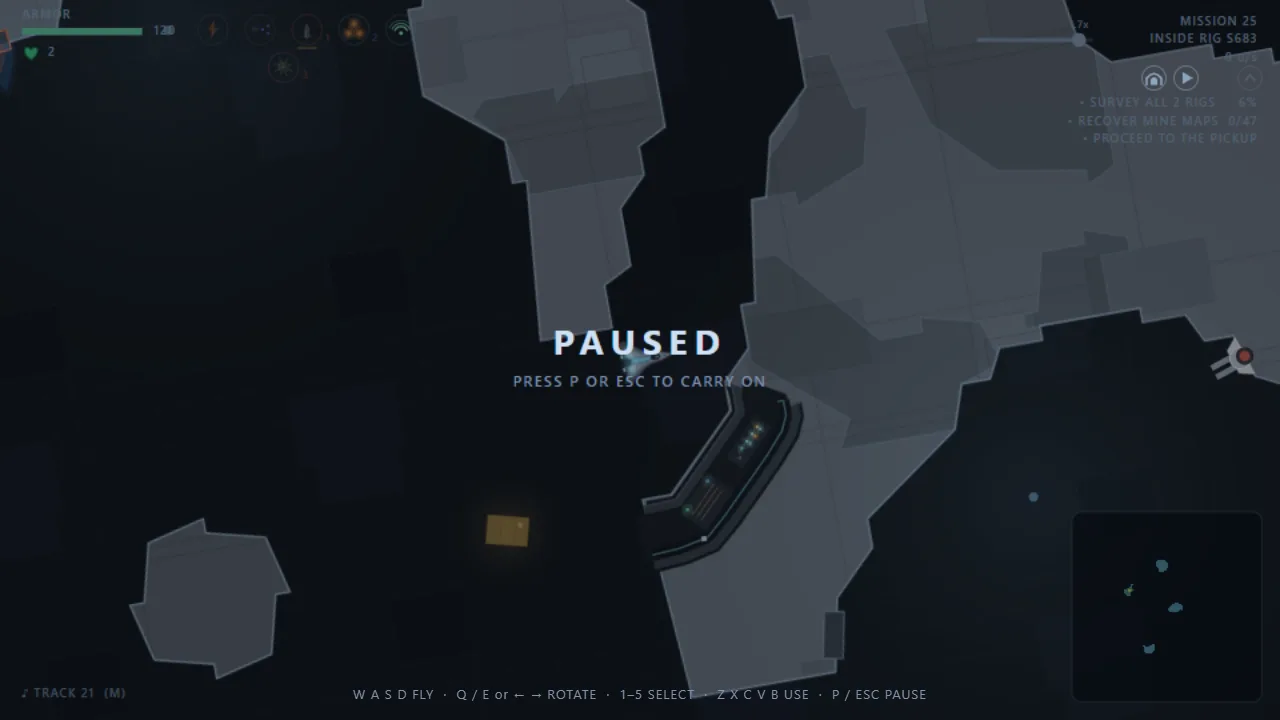
While paused the screen dims, and only the pause and hangar discs, the fold ring and the zoom groove answer. Everything that acts on your ship waits until you carry on.
The ally command disc
Appears once you have allies to command. Tap to cycle the orders and double tap to give the one showing:
- Follow me: escorts fly with you and guard you.
- Waypoint N: one for each tracker marker you've dropped.
- Guard the Java: escorts go back to the carrier.
- Rally: calls an allied capital ship to pull up beside where you are.
- Zena, once you own it: shows FREE in blue or the price. A paid call takes two double taps, the first showing AGAIN. When the free call opens, rings spring off the disc with a chime and it switches to the Zena by itself.
- Ships are sent one at a time, every five seconds.
- Two numbers beside the disc show arrived over sent.
- The ring's color shows how many have arrived: grey with no order, then red, purple, orange and yellow, turning green when all are there.
- A small red cross beside the numbers cancels the order showing.